Equipment:
- LitePanel Accessory – Crossbar 77”
- LitePanel Fabric Translucent 77 x 77 inch
- LitePanel 77 x 77 inch Aluminum Frame
- LiteStand: large
So you’ve been considering venturing outside to shoot portraits, but you’re concerned you may not have the right gear to do it right? Rest assured, you don’t always need to use a lot of equipment to do a professional-level job. In fact a good deal of the time, all you really need is to be able to soften the harsh light of the sun.
This lesson illustrates some simple, straightforward techniques in lighting and shooting outdoor baby portraits.
Topics Covered:
- A New LitePanel Accessory: The GripJaw
- The Lighting Skeleton
- Changing Lenses and Point of View
- Interacting with a 9-Month Old
- Shooting with Undiffused Sunlight
- Comparisons
A New LitePanel Accessory: The GripJaw
For this lawn portrait of my daughter, Nola, I decided to keep the lighting simple and diffuse sunlight with the new Photoflex 77×77 LitePanel Kit. This kit includes a 77×77 inch frame, translucent fabric, a Crossbar, Connector Clips, two XL LiteStands, RockSteady weight bags, a case, and the new Photoflex GripJaw clamp.

The GripJaw is a huge improvement over the previous LitePanel hardware, the Main & T Clamp. In a nutshell, this clamp can securely tighten onto the LitePanel frame, is much more versatile, and when paired with a 2.5″ Grip Swivel, can support the LitePanel frame at almost any angle. Here, the GripJaw is mounted onto a LiteStand and can clamp directly onto the LitePanel frame.
For a wider range of angles and positioning, it’s best to first mount a Grip Swivel to a LiteStand and then secure the GripJaw onto the Grip Swivel. Once you attach the GripJaw to the LitePanel frame, you can adjust the Grip Swivel to secure the desired angle.


The Lighting Skeleton
Here, I set up two XL LiteStands and mounted a Grip Swivel atop each. I then attached the GripJaws to the Grip Swivels and placed the stands roughly 6 feet apart.
Next, I erected the shock-corded LitePanel frame, connected the Crossbar down the middle of the frame for added stability, and then mounted each side of the frame to the GripJaws. Once the frame was secure, I used the Grip Swivels to tilt the frame to an angle relative to the sun’s position.

I wanted to wait until I was ready to shoot before adding the translucent fabric to the frame in case any wind cropped up. When it’s windy outside, these LitePanels (as with any reflectors of this type) can act like sails, in which case, it’s a good idea to have an assistant or two to help prevent the frames from falling over or blowing away.
Once Nola was ready, my wife Tamara brought her over to “the set”. It’s always a good idea to have everything ready to go before you start photographing babies and kids (and some adults) because you’ll only have a short window of time where they’ll be tolerant of you coaxing them to look at the camera. If you have to make adjustments to your lighting or camera gear while they’re on set, you’ll be limiting yourself with a smaller window of time where you’ll be able to capture fresh-looking shots.


Before I had Nola sit in the grass, I asked Tamara to occupy her “off-set” while I attached the LitePanel fabric and framed up the shot. Once the fabric was on, I took a test shot of my composition. In reviewing the result, I noticed that the foreground looked fairly dark where the LitePanel was diffusing light, which I thought was a little distracting.

Changing Lenses and Point of View
To minimize this element of the shot, I quickly switched my 12-60mm lens for a 50-200mm lens and backed up about 15 feet. I also decided to lay down on my stomach with my elbows acting as support for the camera to achieve a lower perspective. Both of these steps would help to minimize the depth of field, as well as the surface area of the diffused grass. Once I was dialed in with the camera and lens settings, I asked Tamara to bring Nola onto the set.

When Tamara was out of the camera frame, Nola quickly became interested in the grass and I took a series of shots without trying to interact with her. Here’s one of my favorites of this series.

In reviewing the results, I was really happy with the quality of light. Here, you can see that the light illuminating Nola is soft and diffused, but that the dark areas of grass aren’t as distracting as before, as it blends in more with the grass in front and behind.
Interacting with a 9-Month Old
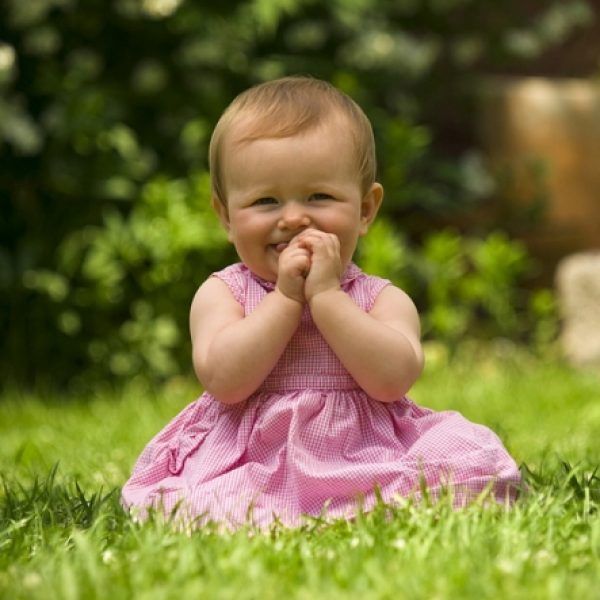
With everything dialed in, I was ready to start interacting with Nola in the hopes that I could get her to look at, or at least in the general direction of, the camera. But that proved to work with limited success, as i was having a hard time looking through the viewfinder while simultaneously interacting with Nola. Fortunately, Tamara saved the day by crouching right next to me and entertaining Nola, while I focused on photographing her expressions. I was able to capture a bunch of great images that day, and this one ended up being one of our favorites.

Shooting with Undiffused Sunlight
Afterward, I decided to take some additional shots from the same vantage point, only this time without the LitePanel in place for comparative purposes. Tamara helped Nola walk around the grass a bit while I took the LitePanel gear down. After a few minutes they came back to the same patch of grass and I took a few more shots of Nola with the direct sun illuminating her.


Comparisons
As you can see from the result, the lighting on Nola here was much higher in contrast, and did not hold the smooth continuous tones as before. Below, you can see a side-by-side comparison.

As you can see from the comparison, a little light diffusion can go a long way in making your portraits that much better. Remember to experiment with your lighting and camera techniques, and above all, have fun in the process!
—
Written and photographed by Ben Clay.
Basic Lighting,
Outdoor Portraits,
