
Equipment
- OctoDome®: Small
- LiteStand Boom
- BoomStand
- RockSteady Bag
- HalfDome®:Medium
- Medium SoftBox Grids for HalfDome
- BackDrop 10’ x 20’ Chroma Green
- ProDuty BackDrop Support Kit
In this lesson, Michael Corsentino taps into the power of High Dynamic Range (HDR) photography and combines it with the technique of background dropout to create a dramatic sports portrait.
This level of image manipulation used to be the sole domain of Hollywood special effects wizards. But with reasonably priced software and good lighting, Michael shows how you can become the master of your own photo fantasy.
These techniques are fairly new to Michael, so we all benefit from his methodical approach and the successful result he achieves on his first project of this kind. As you’ll soon learn, anyone with motivation can accomplish good work using these techniques, as well as apply these methods to other subject matter.
Light with purpose!
Topics Covered:
- Planning a Composite Portrait
- Setting up the Studio Shot
- Preventing Flare
- Opting for Grids and Swapping out the Background
- The Sequence of Lights
- Going for the Pose
- Shooting and Creating an HDR Background
- The Digital Merge
Camera/Media
- Canon 5D
- Adobe Lightroom 3
- Adobe Photoshop CS5
- Nik HDR Pro
- Kubota Image Tools
Planning a Composite Portrait
Inspiration plays an important role in just about everything I do. Lately I’ve been really inspired by the work of my friend and fellow Photoflex® pro Joel Grimes. His composite images are some of the best around, and after learning a few techniques from the master, I thought I’d try creating one of my own.

I asked local football star Joe Trombetta to be the subject for my composite portrait and he agreed. Score! This guy has broken just about every local football record in the books and is definitely a guy to watch. I think we’ll all be hearing his name a lot in the future. He was the perfect person for the bad-ass, mean-muggin’, super hero style portrait I had in mind.
My plan for this composite image called for an edge lighting pattern that would give Joe’s athletic frame added emphasis and drama. This particular lighting pattern is gaining popularity these days. If you keep an eye out for it, you’ll start to see it everywhere.
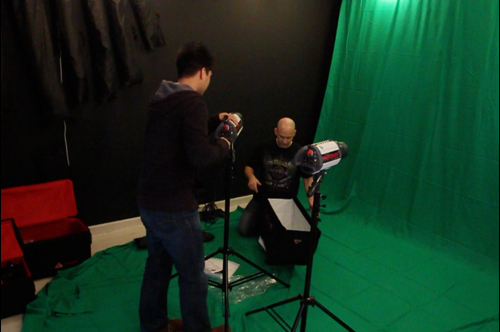
Setting up the Studio Shot
I wanted to try a couple different things to make sure I got the shot I was envisioning. To start with, we put up a Photoflex® Chroma Green backdrop onto a ProDuty® BackDrop Support kit. Later, we would also try a white backdrop. While Joe put his wardrobe together, Jaron and I set the scene.


My plan was to rim light Joe with two medium HalfDome® SoftBoxes on either side while our key light (main light) would be from a small (3-foot) OctoDome® that I would boom above and out of frame.
We chose two StarFlash® 150watt studio strobes for the rim lights and one TritonFlash™ battery strobe for the key light. All three lights we set up after the backdrop was in place.

Preventing Flare
Because I was concerned that I might get some unwanted light spill flaring into my lens, I set up two 39×72 LitePanel kits in front of both HalfDome® strip boxes to serve as scrims or “gobos”.
With my lights in place, I took a shot with both StarFlash heads set to 3/4 power and the TritonFlash set to 1/8th power.
Here’s how the camera was set:
- Exposure Mode: Manual
- Aperture: f/14
- Shutter Speed: 1/60th of a second
- ISO: 100
- Focal Length: 27mm
Here is a shot that clearly shows the placement of both HalfDome® SoftBoxes, and the OctoDome® without the LitePanels obstructing the view. As you can see, my shooting space here was not very big, but it was enough to get what I needed.

Opting for Grids and Swapping out the Background
In reviewing the test shots, I saw that Joe was fairly well exposed, but I wasn’t satisfied with the type of light I was getting. It didn’t seem dramatic or edgy enough for the “bad boy” result I was looking for. So I decided to make a couple of changes.
First, I chose to lose the LitePanels and replace them with Grids attached to each HalfDome. This way, I’d be able keep the light specifically aimed at certain parts of Joe, while simultaneously keeping any light flare to a minimum.
Second, I noticed that I wasn’t getting the separation I wanted from the green background with the exposure setting I wanted to use. So we switched out to a white seamless backdrop in order to provide greater flexibility. Switching the green background out would, of course, prevent me from being able to do a straight extraction, which meant that I’d have to draw a manual path with the Pen tool. But in order to get the image I wanted, I was willing to forgo the automatic and fast post production route.
With all my changes in place, I increased the power of the TritonFlash™ to 1/4 power, which gave me the following result.


I immediately liked this change in the lighting. Joe was lit, but there were several dramatic shadows that would really give my final image an intense mood.
The Sequence of Lights
For comparative purposes, I took three more exposures to show what each light was contributing to the final image. Below, I had only the right StarFlash® with gridded HalfDome® powered on.

Here, you can clearly see how well the Grid was able to keep the light directed where it was aimed. Joe’s right side is nicely lit, but we have virtually no spill onto the backdrop or any other part of Joe. The example below shows what the lighting was like with both HalfDome® SoftBoxes going off.

With the OctoDome from above powered on, you can see our final lighting setup.

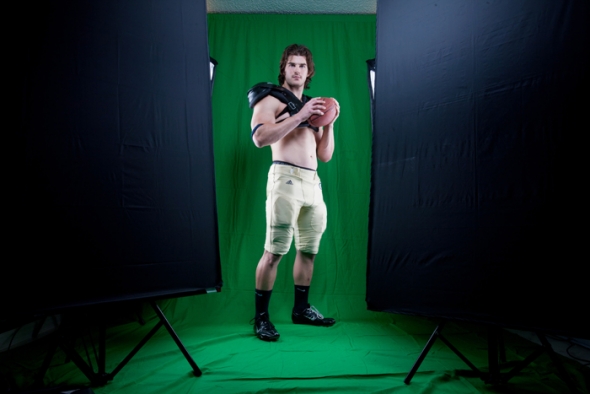
Going for the Pose
Knowing that this was exactly the light I was looking for, I took a series of shots while Joe gave me a variety of poses. My favorite and eventual choice for the composite was figure 16. And because of the way I lit Joe, my job in separating him from the background would be a lot easier and more natural-looking than it would have otherwise.
Without changing the power settings on any of the strobes, I made slight adjustments to the camera:
- Exposure Mode: Manual
- Aperture: f/13
- Shutter Speed: 1/60th of a second
- ISO: 100
- Focal Length: 28mm

Shooting and Creating an HDR Background
After the portrait shoot, I thanked Jaron and Joe and then got ready to go out and shoot the background image. I drove out to a rather lonesome looking road in Petaluma and found a scene that I thought would work well. When framing up the shot, I made sure to shoot from the same height and perspective that I shot Joe.

I decided to take three bracketed exposures of the shot, which I would later merge together digitally, so that I could essentially compress the dynamic range and make the image more dramatic. This technique is called High Dynamic Range (or HDR). I use Nik HDR Pro software to create my HDR images and it has some great presets. I usually start with one of the realistic presets and then adjust the sliders until I find what I’m looking for. As with any new digital technique, it’s easy to go overboard, so try to exercise some restraint in the process.

Combining the three exposures gave me my final HDR background.

The Digital Merge
After I drew a path and created a selection of Joe from the studio shot [figure 20], I dragged it onto the HDR background file and begun working with them both to finesse them and create the final image.

As you can see in the final composite image, the rim-lit studio shot and the HDR background image came together beautifully to create the dramatic portrait I was envisioning.
Though photography is my profession, I’ll never get to the point where I believe I’m done learning. I spend my off hours reading books and talking to other pros so that I can continue to improve. This compositing style of photography is fairly new to me and I feel good about what I’ve been able to do so far with it, but there’s no way I could consider myself proficient at it without getting out there and experimenting with it for a while.
Go out and try new techniques for yourself. Have fun with it! Who knows what greatness you can accomplish?
—
Written and photographed by Michael Corsentino.
Indoor Portraits,
