Equipment:
The portraits were done primarily with the technique of split-lighting, where the model, Samantha, was lit by the flash from one side. Processed afterward in Capture One and Adobe Photoshop, the images were complimented with strong tonal and color enhancements that made the most of the textures and features of the location.
Topics Covered:
- The Concept
- Easy Setup of TritonFlash on Location
- Finding the Right Light
- Using Split-Lighting to Compliment the Model and Mood
- The Low-Key, Cinematic Look
- Defining Shape and Shadows
- Working with Color
- Notes on Processing
- Putting Together the Images as an Editorial
The Concept
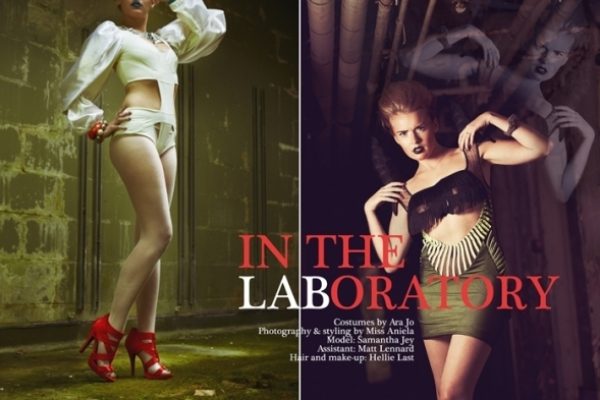
The purpose of this shoot was to show off the costumes of a London-based fashion designer, Ara Jo, with a model in an interesting location. The shoot was not done for any particular client, but we hired the team as an assignment for my own portfolio, for the designer’s portfolio, and potentially as a magazine submission.
The costumes were quite avant-garde and I wanted a dramatic scene to give them deserving context. We chose an abandoned building, originally an animal laboratory, which we’d already scouted the day before to make sure we could safely access the building, and pinpoint rooms we wanted to shoot in.

Easy Setup of TritonFlash on Location
I’m accustomed to using natural light and normally in this kind of environment; I’d use HDR techniques to capture the luminance range of light coming through the windows and cracks of an abandoned place.
However, it was crucial that we use lighting equipment because the goal was to produce competent fashion portraits where the hair, make-up and outfit were lit professionally. I also wanted to be practical and keep the equipment minimal: camera, tripod and one TritonFlash™ with an extra small OctoDome®.

We arrived at the location and Hellie, the hair and make-up artist, got to work (figure 3), whilst Matt and I prepared the first setup. We had three outfits to photograph, so we planned to shoot for about 30-40 minutes in each of them. With the first look prepared, we headed to one of the most impressive rooms in this building, a “green room” where moss and lichen were growing steadily over the floor and walls (in which I’d previously shot a self-portrait).


This was the most difficult session of the day for a number of reasons, but mainly due to everyone warming up. I was figuring out what to do, the model was only just becoming comfortable, and because I had not used lighting a great deal before, I had it faced almost directly onto Sam which resulted in a flat look, not doing much for her face or outfit.
Finding the Right Light
I moved her onto a doorway where I shot full-length portraits of her standing with the bright sun coming through the doorway on one side, making her into an interesting silhouette. I shot some without the flash, and some with the flash from one side, but the shots didn’t move me. The shots without flash were too dark, and the shots with flash were too artificial looking. I needed a lighting method that would complement the model in a way that was dramatic, but not noticeable as “flash”.

We moved onto the second outfit, the most prominent of the day: a green mini tassel-breasted dress with devil horn-shoulder pieces.


Using Split-Lighting to Compliment the Model and Mood
As I shot, Matt and I began to move the light further round to one side, so that it was coming across the model, in what is known as a split-lighting technique. Instinctively, I knew that this was making the shots a lot more effective.
I really felt I was getting into my groove when I moved Sam out into the hallway following Matt’s suggestion. We kept the TritonFlash™ inside the room she’d just come out from, and I positioned myself in the hallway in front of her, triggering the flash through the wall. [figure 8]

Sam, my shooting technique, and the potential of the TritonFlash™ started to come together now. Sam posed coolly and effortlessly, sometimes raising an arm up to the interesting exposed pipes on the ceiling. The flash lit her from the direction of the natural light coming from the room, which gave her just enough illumination without being overbearing – and essentially, made a catch-light in her eyes that makes these shots work.

The Low-Key, Cinematic Look
I shot with the Phase One 645DF camera and P40+ back throughout this shoot. I was testing the capabilities of the medium format system against my usual DSLR. For most of the shoot, I used a Phase One 75-150mm medium telephoto lens because I wanted to produce shots with the flattering shallow depth of field commonly seen in fashion portraits.
I liked the shots in the hallway for their cinematic mood. The split-lighting technique made her appear taller and more defined, due to the way in which it cast the light over one side of her face and body.

Defining Shape and Shadows
We shot some more of Sam in this second outfit inside a room which had a wall marked with a startlingly tidy series of black scuffs, where lockers or cupboards had previously hung. I positioned the light from a 45-degree angle from one side, which threw Sam’s shadow onto the wall behind her and made for an interesting shape of the shadow of the horns. Below, you can see the difference the TritonFlash™ and OctoDome® made for this shot.


These images were interesting when converted to black and white because of all the different dark shapes against the lighter areas in the image.


Working with Color
In the last outfit, with some hair and make-up tweaks and the addition of a headpiece, we shot Sam inside a room with a burnt-down sofa, and then standing in a doorway, capturing the washed-out blue of the walls around her. We used similar positions of the TritonFlash from a diagonal angle.


For the last shots, I removed the headpiece from Sam and posed her by an interesting window. The window was dark and layered with dirt with interesting colouration that I wanted to capture. I had the flash positioned on one side of Sam (on top of a work surface in the room) at her head height. This produced a dramatic, half-lit result on her face and elevated arms, which came out even bolder after my processing.

Notes on Post Processing
Post-production is always very important in my work. I seldom find that I pinpoint the mood in-camera – it can happen, but not often.
I had over 600 shots from this shoot and an important step was to sort through them. Every type of photographer knows that the selection process of sifting through all the shots from a shoot – which could be hundreds – is a part of the process just as valid as the shooting. The decisions made in the selection of the process are critical to the whole process of creation, and your own personal choices further define your style. Plus, the processing done to the images will shape them even more. I always post-process my images, sometimes dramatically, but other times just to make subtle changes that can have transformational effects on the mood.
In Photoshop, I love to see how the use of color and tonal adjustments in Curves transform the mood of my shots. Here, you can see a side-by-side comparison: how an image looks when it comes out of camera next to how it looks after it’s been processed in Photoshop.

I noticed that overall, the images benefited from some desaturation because the make-up looked quite orange across the images. I wanted to enrich the color and tone of the walls and the outfits overall; also airbrush the skin slightly with the clone stamp tool and dodge tool, sharpen the eyes and boost the effect of the eye make-up.
—
Written and photographed by Miss Aniela.
Outdoor Portraits,
Indoor Portraits,
