
Equipment:
Before you go to shoot that early morning outdoor portrait, make sure to have that checklist with you:
Coffee. ✓
Camera. ✓
Telephoto lens. ✓
Supplemental portable lighting gear to make that morning light pop. ✓ ✓ ✓
When it comes to creating outdoor portraits, early morning sunlight alone is often not enough to generate the “magic” you envision.
This lesson features some portable Photoflex equipment, including StarFire™ ShoeMount flashes, DualFlash Hardware and a LiteReach™, and demonstrates some straightforward techniques in achieving beautiful outdoor portraits.
Topics Covered:
- The Concept
- Considering the Sun’s Position
- Trying a Flash Fill
- Changing Lenses
- Bouncing Sunlight
- Coming In Tight
The Concept
With this shoot, I wanted to capture some early morning portraits of my model, Mattie, at a local beach. I wanted to shoot at dawn to take advantage of the warm quality of light, and to be able to enhance it somewhat with some additional lighting equipment.
My assistant James and I arrived at the beach around 6:00 am to get set up for the shoot. Mattie would arrive a half an hour later once we were set up and had our game plan down.

The lighting gear we used all fit into two cases: a Photoflex GigBag® and a LitePanel™ Carry Bag. Here’s James carrying these cases, along with his camera bag.


Considering the Sun’s Position
Although the beach was west-facing, I wanted to shoot with the dunes in the background, which meant that the sun, rising in the east, would be back-lighting Mattie, which was ideal. When shooting portraits outdoors, I prefer to have the sun back-lighting my subjects so as to prevent hard shadows from being cast across the face. Depending upon the subject’s features, these shadows can be distracting and unflattering.
When Mattie arrived, I had her stand with her back to the sun and took some shots with a standard lens with exposure settings that would not overexpose her hair or the background.


Here’s a result from this series.
As you can see from the result, the exposure on Mattie’s face is a little dark. But had I shot at a brighter exposure level, Mattie’s hair would have been overexposed. As a rule, photographers – particularly portrait photographers – tend to avoid overexposing any area of the frame because over-exposured areas have no detail, and no detail ultimately becomes a distracting element.
Trying a Flash Fill
For comparative purposes, I shot another series at a slightly higher exposure level and with the built-in flash activated. This is a method many novices will use for outdoor portraits, as it helps to reduce the contrast.


Here, you can see that the contrast ratio is somewhat better than in the previous shot, but at the expense of a somewhat unnatural quality of light, which is most evident in the eyes. See the tiny reflections centered in the middle of the pupils? These reflections would not appear like this in person unless you happened to be holding a tiny daylight-balanced flashlight directly into her eyes while you looked at her. So unless you’re a doctor or optometrist and conduct your examinations at the beach, this is a fairly unlikely lighting scenario.
Changing Lenses
You might be thinking, “Right, but what if you just backed up and shot full-length? You wouldn’t be able to see these small catch-lights from that distance.” A good point, but there’d be another thing that wouldn’t be showing up from that distance as well: the light from the flash.
To illustrate, I next swapped out the standard lens with a telephoto lens, moved back about 50 feet, and took a series of shots with the flash still activated. As you can see from the result below, the flash was too far away to have any effect on the exposure.


Bouncing Sunlight
With regards to the lighting, we were now back to square one. Mattie’s hair was right on the edge of being overexposed, while the majority of the light on her body was significantly underexposed. I liked the exposure on the background, so all I needed to do was bounce some sunlight into the shadow areas.
James brought over the 39×72 inch LitePanel Kit he had set up previously and angled it so that the Soft Gold fabric on the panel would bounce warm sunlight onto Mattie from head to toe. Remember that if you want to create an even reflection for your full-length shots, you need to use a light source or reflector at least as tall as your subject. At 6 feet tall in the vertical position, the LitePanel is the perfect choice. (For basketball players, you might might to opt for the 77×77 LitePanel Kit!)
Although we were lucky with just minor wind this morning, we made sure the LitePanel Kit was stable by weighting down the LiteStand with a RockSteady® weight bag (filled with sand from the beach). The other thing that made this setup sturdier was the GripJaw™ and Grip Swivel Hardware, which attaches the LiteStand to the LitePanel frame, and which are both now included with all LitePanel Kits.


With the LitePanel in position, I took a series of shots at the same exposure settings, but without the built-in flash activated.


Here’s one from this series.

In this shot, you can see that the LitePanel made a tremendous impact on the lighting of the shot. The warm light of the morning sun mixed with the warm tone of the Soft Gold fabric really made Mattie’s skin tone glow. The light levels of the subject and background were now much more balanced and the shot had a somewhat cinematic feel to it.
In the side-by-side comparison below, you can see how much of a difference the LitePanel made here.

Coming In Tight
Next, I wanted to come in tight again and focus on the head-and-shoulders crop. In addition to using the LitePanel, I also wanted to throw some soft light over Mattie’s hair camera-right to further separate it from the background. I used a Small (3-foot) OctoDome® powered by two Photoflex StarFire shoe mount flashes and mounted to a LiteReach. Below, James documented the setup process.
First, I set up the LiteReach, mounted a HeavyDuty Swivel to it and then temporarily mounted the DualFlash Adapter Kit to the Swivel. I then set up the Small OctoDome by way of a Reflector Connector.


Next, I mounted the DualFlash Hardware to the Reflector Connector and then attached it to the Heavy Duty Swivel.
I then configured the internal reflective panels of the OctoDome to both silver and gold to match the warm light of the sun and LitePanel.


Finally, I attached wireless receivers to both of the FlashFire flashes, mounted them to each of the cold shoes of the DualFlash Hardware and powered them up. With the wireless transmitter mounted to the hot shoe of the camera, I would be able to trip the flashes for the next series of shots.


With everything synced up, I asked James to detach the legs of the LiteReach and extend the riser so that he could hold it above Mattie. I also asked him to set each flash to approximately half power so that they could recycle quickly, which would allow me to shoot at a faster pace.


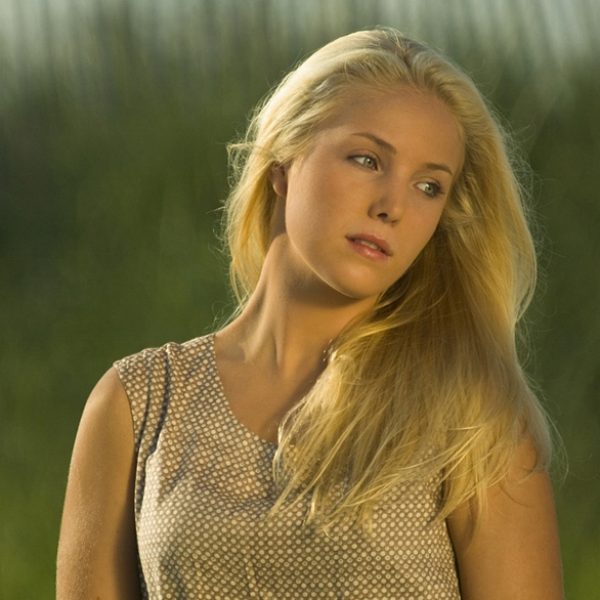
Once everything and everyone were in position, I took a final series of shots. Below are two results from this series.


The look of the shots ended up being what I was going for. The LitePanel and Small OctoDome worked perfectly to accentuate the warm light of the sun, the telephoto lens helped to keep the optical distortion low and throw the background out of focus, and Mattie (a relative newcomer to modeling) did a great job looking great, relaxed and natural.
In the side-by-side comparison below, you can see how effective supplemental lighting can be when shooting outdoor portraits.

—
Written and photographed by Ben Clay.
Outdoor Portraits,
