
During the holiday season, why not take advantage of the fact that you’ll be indoors with family and friends by shooting some nice portraits? Even if you’re not a seasoned portrait photographer, you can still achieve beautiful results with some easy-to-use continuous lighting equipment and the following lighting tips.
In this recently updated lesson from a few years ago, photographer Ben Clay used a run-of-the-mill DSLR, two lighting kits, and a collapsible reflector to illustrate a simple approach to lighting and shooting a living room portrait.
Topics Covered:
- The shortcomings of built-in flash lighting
- Creating instant “window lighting”
- The importance of a hair light
- Balancing the light of the subject and the background
- Rim light as a main light
The Typical Snapshot
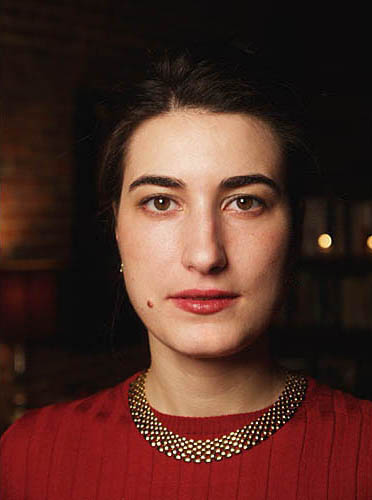
For this shoot, I wanted to demonstrate a few lighting approaches for this living room portrait of my friend, Liz. Before I set up any lighting gear, though, I first took a typical snapshot to compare against the final results.
I set a compact digital camera to AUTO, activated the built-in flash and took a shot. This is how the majority of people go about taking pictures, whether it’s indoors or otherwise.


As you can see, this “auto pilot” approach results in a not so flattering result. The lighting is flat and unnatural looking and the background appears drab and much darker than it actually did in person. It’s a familiar look to most people, but not a very pleasing one.
One Soft Box Lighting Setup
The first thing I did was set up a simple, diffused lighting kit to create some natural-looking light. For the main light, I set up my light source with a Photoflex Small LiteDome. I then positioned this light to the left side of Liz, and as close as possible without it entering the frame of the camera. This light would project a soft, wrap-around light across her face. Keep in mind that the closer a diffused light source is to its subject, the softer the quality of light will be.Once the light was positioned, I made the following adjustments to my DSLR:
- Exposure mode: Manual
- Focus mode: Manual
- ISO: 100
- Format: Raw
I then set my aperture to f/2.8 for a limited depth of field, set the shutter to accommodate a good exposure, and took a shot with a vertical frame.
Notice how just this one light has made a substantial improvement over the first shot. It’s a much more natural look than with the built-in flash, and I was able to capture a better representation of Liz’s face. Many photographers refer to this type of setup as “window lighting”, since the light from the soft box simulates the same indirect light that comes through, you guessed it, a window.
After reviewing the image on the camera, I decided to bounce some warm light into the shadow side of Liz’s face to help create some definition. So, I set up a 32″ MultiDisc Kit and positioned it (Soft Gold side facing) to bounce some of the light from the LiteDome back into the shadows. Once I had the MultiDisc positioned where I wanted it, I took another shot.


Notice how the Soft Gold side of the 32″ MultiDisc helps to bounce warm light into the shadow side of Liz’s face.Let’s look at differences between the results so far:

.As you can see, the built-in flash result is both unflattering and unnatural looking, whereas the other two results render Liz as she appears in person.
Two Soft Box Lighting Setup
After reviewing the previous result, I decided to create more separation between Liz and the background, since her hair was indistinguishable from the background. This meant I needed to set up another soft box.
I decided to replace the Small LiteDome with a Large Litedome to get even more diffused light falling across Liz’s face. After another few minutes to set this up, I moved the Small LiteDome behind Liz and directed it toward the back of her head to create a hair light. In addition to adding highlights to Liz’s hair, this light would also create separation between Liz and the background.


Once the lights were in position, I took another shot.

While the hair light helped to define the hair, I now felt that the background was a little too dark against my illuminated model. By lighting the background, I would be able to make the shot more dynamic, as well as to create more separation from the background.
So, I rotated the Small LiteDome away from the back of Liz’s head and onto the living room wall. Once I had the right lighting angle, I took another shot.


The result showed that brightening the room improved the feel of the shot, but I was still lacking sufficient contrast between the hair and the background, particularly on the right side.
Instead of setting up a third light, I decided to use a 32″ MultiDisc Kit as a hair light. This Kit consists of a MultiDisc, which you clip to a LiteDisc Holder, which you then mount to a LiteStand. Once this was set up, I positioned the MultiDisc in close to the back of Liz’s head so that the light from the Large LiteDome reflected back into her hair. I took another shot.


At this point, the lighting was where I wanted it. I had good separation on both sides of the hair and the light on Liz and on the background looked natural and tied together nicely.With this side-by-side comparison, you can spot the differences more readily:

Rim Lighting
Next, I wanted to have Liz step back a little into the living room to help tie her in more with the room. Starting off with a lighting setup similar to the previous one, I brought the Large LiteDome in as close as I could and positioned the Small LiteDome on the other side to illuminate the room.
I changed the camera orientation to a horizontal frame to show more of the room and took another series of shots.


The lighting on these really worked well for this setup, simple and elegant. The Large LiteDome created a beautifully soft main light and the Small LiteDome illuminated the room subtly for a seamless result.Next, I wanted to try a different lighting approach. Instead of placing the main light to illuminate the front of Liz, I decided to use it as a rim light. Similar to the hair light, the rim light rakes across the outline of your subject to create separation from the background.I placed the Large LiteDome off to the back right of the room facing Liz and kept the Small illuminating the room. I took a few more shots.


In the result, you can see how the rim light works well to outline Liz, but that the front of the model is too dark. So I decided to use the 32″ MultiDisc to bounce light into the shadows, rather than use another light, mainly because I wanted to maintain the dramatic effect of the rim light.
Once the MultiDisc was in position, I took a final series of shots.


As you can see from the result, this predominantly rim-lit approach creates a very dynamic result that is both directional and diffused, culminating in a very inviting living room portrait.
Here’s the lineup of the different result shots:

Before packing up the gear, I decided to take one more shot of Liz with her then boyfriend/now husband with this same lighting setup. Minutes later, they had a charming living room portrait that they would later print, frame and give to their respective parents.
Notice how the rim light creates great separation from the background, but that it doesn’t interfere with the overall soft lighting.

Remember to experiment with your lighting and camera techniques as much as you can. After you’re comfortable with a few different approaches to lighting and shooting, you and your subjects can really have fun creating beautiful portraits!
—
Written and photographed by Ben Clay.
Basic Lighting,
Indoor Portraits,
