In commercial photography, there’s a particular type of shot that lends itself to web and print layouts called the silhouetted shot, or simply the “silo”. When produced correctly, the object will appear to be sitting in a white room surrounded by light. It’s a clean style that looks natural on a white page and is not confined to a square or rectangular frame.
Much of the success of a silhouetted shot is dependent on lighting, which to many might seem complicated and expensive. As you’ll discover in this lesson, however, this does not have to be the case. This lesson demonstrates how to create a natural-looking silhouetted shot with very simple and inexpensive lighting tools and minor digital editing.
The Window-lit Shot
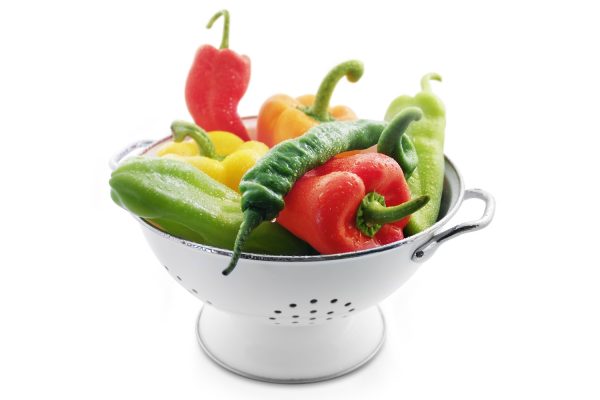
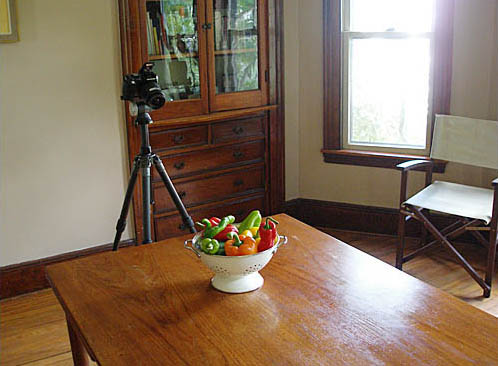
To demonstrate the silhouetted technique, I decided to shoot a strainer full of peppers. For comparison sake, I started with taking shots the way most people would.
After arranging the peppers in the strainer, I placed it on my dining room table, mounted my camera to a tripod, and framed up the shot. In this situation, the light from the windows served to illuminate the shot.
Here were my camera settings:
- Exposure Mode: Manual
- Apreture: f/4.5
- Shutter Speed: 0.6 sec
- ISO: 100
- Focus: Manual
- White Balance: Daylight, or 5000K
- Flash: Disabled

The result shows a fairly natural looking result, although there is quite a bit of contrast to the shot, even though it is lit with indirect window light. Notice how bright (and over-exposed) the strainer is on the left-hand side, while the peppers on the right-hand side are hidden in shadow.
Built-in Flash Lighting
Next, I used the flash of the camera to show how this lighting would affect the shot. After enabling the flash, I set the Exposure Mode to Auto and took a shot.


As you can see, this type of lighting produces a flat, unnatural look. Because the light from the flash is traveling in the same direction as the lens, it tends to flatten out any sense of dimension. While everything is illuminated adequately, the quality of light is that of a flashlight in the dark — not exactly a look that makes the mouth water!
Shooting With Hard Lights
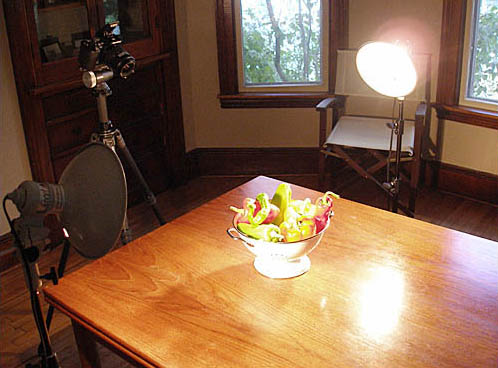
Next, I set up some simple Tungsten lights to better control the lighting of the shot. I used the Photoflex First Studio Product Kit, which comes with two lights, two stands, and a medium LiteIgloo shooting enclosure (which you’ll see later). I first brought one light from this kit to the right of the peppers and angled it to illuminate them from the side.

When the light was where I wanted it, I disabled the flash on the camera, set the White Balance to Tungsten to color-balance the camera for Tungsten lights, set the Exposure Mode back to Manual, adjusted the shutter speed for exposure, and took another shot.

This result is similar to the first window light shot in that the contrast is very high. With the small light source to the side, its “hard light” rakes across the peppers to create both bright and dark areas of the shot. Also notice the reflections in the peppers: small and bright. Had I been using a larger light source, like a large soft box, these reflections would be larger and softer and the light would “wrap around” the peppers in a smooth, gradual way.
To reduce the contrast, I brought in the second light to the other side, which would fill in the shadows cast from the first light. Once in position, I took another shot at the same exposure settings.

The two lights together helped to illuminate every area of the peppers. And because both lights were 90-degrees to the camera, they did a good job at creating dimension, as compared to the built-in flash example.
But even though the peppers are illuminated well here, the quality of the light des not resemble light that would be flooding a room. This meant I needed to modify the light further.
Diffusing Light With A LiteIgloo
What do you do when you don’t have a room illuminated with light? You bring the room to the set! For photographers on a budget, the LiteIgloo (included in the First Studio Product Kit) is a great solution. It’s a foldable shooting enclosure that has walls made from the same translucent fabric used in soft boxes that diffuses “hard light” in the same way.
Some of the most convincing “silo” shots are the ones in which the subject matter is backlit. This type of lighting lends itself better to these types of shots as it tends to look more natural and not “cut out.” So here, I simply moved the lights toward the rear of the LiteIgloo and pivoted each one so that they both faced the LiteIgloo directly.


In this result, the peppers are now illuminated on all sides while still maintaining a good sense of dimension. Because the light has illuminated a good portion of the LiteIgloo and diffused the light source, the quality of light is now soft and gradual. I could have stopped here, but I wanted to enhance the shot further by adding fresh mist to the shot, as well as dropping out the background digitally via the Pen tool in Photoshop. and had a great shot to drop out the background and place on a white page.

The result: a studio quality product shot done in my dining room!
Final camera settings:
- Exposure Mode: Manual
- Aperture: f/2.0
- Shutter Speed: 1/160th of a second
- ISO: 100
- Focal length: 100mm
- Focus: Manual
- White Balance: Daylight, or 5000K
- Flash: Disabled
—
Written and photographed by Benjamin Clay.
Product/Still Life,
