

Creating a sense of drama in a portrait does not need be a difficult task as long as you employ the right tools and techniques. As opposed to the traditional headshot, dramatic portraiture does not follow any prescribed formula.
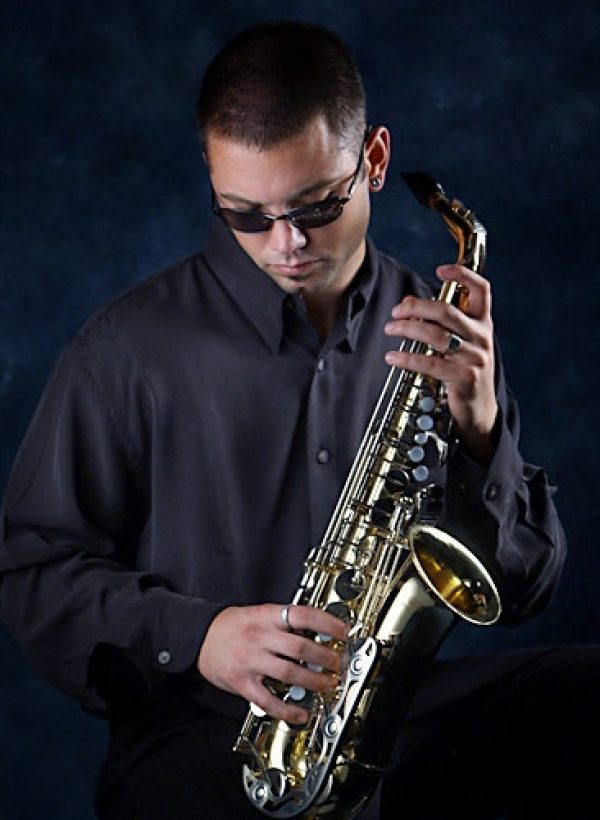
This lesson demonstrates how to employ a single Starlite with a 3-foot OctoDome NXT to create this moody image of a saxophone player. It then shows how adding a second Starlite head further increases the range of possibilities in lighting a portrait like this.
Topics Covered:
- Positioning the Main Light
- Experimenting with Negative Fill
- Using a White LitePanel as a Fill Light
- Adding a Hair Light
- Using Extra Diffusion
- Adding a Rim Light
- Narrowing the Spread of Light
Positioning the Main Light
To start things off, we positioned our main light, a Starlite OctoDome nxt Kit, at a 45° angle and to the left of the subject.
We positioned the light parallel to the subject plane, being careful to spread an equal amount of light from the top of the model’s head all the way down to the bottom of the saxophone. The background was a textured muslin backdrop supported with a ProDuty Backdrop Support Kit.
After reviewing our first result, we knew that we were off to a good start. The main light was soft, yet directional, and the 3-foot OctoDome NXT was just large enough to spread the light evenly from the top edge to the bottom edge of the frame. We also thought the deep blue color in the background helped to add to the jazz theme.
Experimenting with Negative Fill
Next, we decided to experiment by creating some negative fill on the opposite side of the subject. Negative fill refers to using black material to absorb light from the subject instead of using a white of silver material to reflect light back.
Here, we used a 39×72″ LitePanel Kit fitted with Black/White fabric. We positioned our LitePanel with the black side facing out as close as possible to the model on the opposite side from the main light.
In the result, we can see that the black LitePanel made a very subtle difference. Notice that the shadow side of the subject is a bit darker and that many of the specular highlights on the right side of the saxophone are gone.
Negative fill is a common technique in portrait lighting when the goal is to achieve a dramatic image by using deep shadows. In this case, the result was interesting, but not quite what we were after.
Using a White LitePanel as a Fill Light
We could have taken this image further in same direction by using carefully placed reflectors to maintain the deep shadows, while accentuating the important parts of the brass instrument. But instead, we decided to go a different route. For the next shot we simply flipped the fabric on the LitePanel so that the white side was facing the subject.
By using the white fabric, we added a reflected fill light to the shadow side of the subject. In the result, we can see that the white LitePanel fabric was effective in adding light to the model’s face, as well as in lighting the right side of the saxophone.
Here, the saxophone had a long white reflection on the right side, which separated it from the dark background. This result was getting much closer to what we were after. In fact, this was about as far as we could take this shot using only one light.
With our single light source and reflector positioned just right, we decided that we could take this shot a step further by adding a hair light.
Adding a Hair Light
For the next shot, we set up a 500-Watt Starlite with small Silver HalfDome on a Boom and positioned it directly above and slightly behind the model’s head.
When positioning a hair light, it’s important to pay close attention to how it affects the overall shot. Typically, the goal is to light the hair and shoulders, but not to have any light spilling onto the face.
The hair light worked nicely to separate the model’s head from the background and to create a greater sense of depth in this portrait. Notice how the long and narrow shape of the small HalfDome spread the light evenly across both shoulders and even reached the mouthpiece of the saxophone.
Shown below is a side-by-side comparison of the four results we’ve demonstrated so far.
- First, we set up the main light at a 45° angle to the subject.
- Next, we tried using a black LitePanel to create negative fill on the opposite side.
- Then, we replaced the black fabric on the LitePanel with white fabric to reflect some light into the shadows.
- Finally, we added a second Starlite with a small HalfDome, attached to a boom for lighting the hair, shoulders, and top portion of the saxophone.
The results above are just one example of what can be achieved using two Starlites and a reflector. Next, we will explore an alternative lighting solution using more or less the same setup. Stylistically, the previous shot might be considered somewhat on the traditional side of portrait lighting. In the next sequence of lighting setups, our goal was to create a more dramatic lighting style for this musician portrait.
For the next series of shots, we decided to start from scratch and go back to our very first main light setup. Shown here is the same setup we used for the first shot in this lesson.
And, here is the same result that we obtained earlier using a StarLite OctoDome nxt Kit positioned as our main light at 45° to the subject.
(We are re-introducing this shot as a new starting point for the new lighting changes described below.)
Using Extra Diffusion
Next, we decided to use our LitePanel, this time fitted with white/translucent fabric to create extra diffusion for the main light. Keeping the position of the main light unaltered, we simply placed our translucent LitePanel directly in front of the SoftBox.
By adding more diffusion to the main light, we were able to soften the light more and reduce some of the bright specular highlights on the highly reflective surfaces of the saxophone.
As you can see from the result, the extra layer of diffusion significantly improved the quality of light on the saxophone. Notice the long, graduated reflection on the brass surface of the saxophone. This is a major improvement over the sharp specular highlights we were getting in our previous shot. Also, note that the softer light helps to eliminate some of the bright highlights on the model’s forehead, making for a more flattering portrait light.
Adding a Rim Light
With our main light in place and modified to our liking, our next step was to add some style to this portrait by using a rim lighting technique. To do this, we set up a 500-Watt StarLite with a small SilverDome on a Background LiteStand and positioned it about five feet to the right and behind the subject.
We aimed the light at model’s head and shoulder and made sure that some of the light was reaching the right edge of the saxophone. In this result, you can see the effect of the rim light by itself. When working with multiple lights, it’s important to test each light individually to see exactly what each light is doing. In this example, we can see that the rim light was positioned to give us just the right amount of light around the right edge of the model and the instrument.
Upon closer inspection, we noticed that some of the rim light was spilling onto the model’s nose. Normally, this would be a distracting element in a traditional portrait. However, in this case we thought it was appropriate. Had we moved the light back slightly to prevent it from spilling onto the nose, we would have lost much of the light that was reaching the edge of the saxophone. We decided that little bit of spill actually worked for the dramatic look we were after.
The main point here is that there are no rules in lighting, only guidelines. Often, good lighting comes down to making decisions based upon experience and experimentation. Here is the result using the main light with extra diffusion together with the rim light.
Shown below is a side-by-side comparison of the three shots we took to arrive at the previous result.
- We started with a 3-foot OctoDome as our main light
- Next, we added another layer of diffusion to our main light using a 39×72″ White Translucent LitePanel
- Then, we added a rim light using a 500-Watt Starlite with a Small SilverDome.
Narrowing the Spread of Light
To add the final touch to this dramatic portrait, we decided to tone down the background by adding Accessory Grids to both the main and rim lights.
Our goal here was to narrow the spread of both lights in order to minimize the amount of light spilling onto the background. In our final result, you can see the narrowing effect of both lights. In this shot, notice how the background is significantly darker. We felt that this made for a more dramatic, more stylistic interpretation of the portrait.
As mentioned above, successful portrait lighting begins with having the right tools and employing the appropriate techniques to achieve the look you’re after. More often than not, a small adjustment or modification to the lighting can make a huge difference in the resulting image.
This lesson is just one example of how a basic two light setup can be fine tuned to create a variety of results based on your own taste. Remember to experiment with your lighting, and above all, have fun in the process!
Indoor Portraits,
